Regal

This is for Donna Peach. She is a peach. I painted this in pastel earlier this year. Donna is an active part of SPO (sportsmansparadiseonline.com) that is a treasure. She always has uplifting posts, creativity and always thinks of her community first, not herself. I only know Donna here. And that is a remarkable woman to know. I post this pastel painting I did, in her honor. The only common link I have with her, and I wish her well.

Posted in Pastel, Uncategorized | Leave a comment

My Leah in Progress

The first step in any painting, after you got the subject matter in your head, is to pick what kind of paper or board you want to put it on. My personal preferences are Kitty Wallis pastel paper (museum or professional grade-white) for full detailed paintings. The ultra fine ‘sandy’ grain on this paper can hold many, many layers of pastel. For nearly the same reason I also like the Ampersand pastel boards. The ‘sandy’ texture is a wee bit harder but also holds several layers of pastel. I have experimented with many other papers like Canson Mi Teintes paper and boards and enjoyed those for the different effects that are achieved on them. They don’t hold as many layers as the Wallis papers, so I usually use those when I don’t want to be as clearly detailed in a painting.

Next, I decide how to paint the subject. In the case of My Leah I took white Ampersand pastel board and tinted the whole surface with a yellow gold wash with turpenoid. After using vine charcoal to draw in the outline of my subject and place key components like the eyes, I begin to do the background. I wanted it to be in an old painterly style allowing the warmth of the yellow to show thru to keep the painting warm. This is one of several ways I start a painting. Watch how My Leah in Progress ends with My Leah. . . Finished!

My Leah in Progress

Notice my reference photo. It was the angle of her head and the shine of her hair in the photo that enchanted me. I used vine charcoal to draw the outline or silhouette of Leah.

My Leah in progress

I next apply the darkest colors with in the subject. At first I was going to have the hair wisp across her shoulder. In nearly all pastel paintings thus far I tend to start in the background and move forward and go from the top to the bottom.

My Leah in Progress

The hair was the most enjoyable part of doing this painting. Her hair naturally glowed with warmth and youthful vitality. I chose maroon, deep blue, and warm gold as three of the main colors in her hair. Layer upon layer until the colors were so blended that they glowed like her own hair in real life. At this point I had decided that I liked the more formal structure of her hair placement and opted not to add the few wisps draping across her shoulder.


I had to re-draw the outline of her face since the perimeter got a bit lost with the application of the background and her hair. Then it’s a matter of layering the colors of her complexion. Leah’s skin is exceptionally creamy and I wanted that to shine through to complement the overall warmth of her hair. The eyebrows and eyelashes were done using the maroon and deep blue used in her hair.

My Leah.....Finished

The final part of the painting was to finish up with the shirt and refine the highlights and shadows.

My Leah

Posted in How She Does It, Pastel | Tagged , , , | Leave a comment

Why tint the paper before painting?

Following the My Leah in Progress post, I would like to share other paintings I started the same way. There are several reasons to consider why one would want to tint the whole paper before painting a picture. One might think “What’s the big deal, doesn’t it all get covered, anyway?”

Well, no if you choose to do it this way. The purpose would be that you would WANT some of the color to glow through to enhance the overall effect of your paintings. The color underneath was chosen after the subject. This is also why I like white paper. I get to ‘tint’ the paper however I want and not have a bunch of gray paper and wishing I had a brown or blue.

I usually use orderless turpenoid as a wash over the pastel color I lay down to tone the paper. I have also used plain water. Both work well, but I do prefer the ‘oily’ or buttery feel after using turpenoid. I let the wash dry before drawing with charcoal the outline of my subject(s). Then I begin to create a painting.


Drying Chili Peppers (Pastel on Wallis paper)

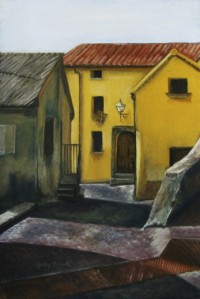
This painting is of a very old village scene in a little town of Cellara Italy. I chose a burnt umber pastel with a turpenoid wash to be the underpainting to keep an old well worn flavor to the painting.

Elements of 101 (Pastel on Wallis paper)

A burnt umber pastel in a turpenoid wash was used as a tone under this painting in keeping with the rich manly look to the atmosphere of the subject.

Grandpa's Gentle Hands (Pastel on Wallis paper)

I took several photos on a very bright summer day of this Granddaughter/Grandpa pair. I used a warm pumpkin color in a turpenoid wash in the middle of the paper and allowed the color to come thru to emphasize the hot color of the skin tones in the sun.

No One's Here (Pastel on Wallis paper)

I used a brick red pastel in a turpenoid wash under this painting. As I worked the very light colored stucco on top, I realized my mistake. The door worked great, but given the fact that I inadvertently created pink stucco, I had to re-evaluate my application. Wallis paper allows for several layer applied and by putting a workable fixative on top, I was able to minimize the brick color beneath to mingle with the lighter stucco color.

Lilac and Apple Blossom (Pastel on Ampersand pastel board)

The pastel board was toned with a purple pink pastel in a turpenoid wash. I allowed the glow of the underpainting to show through in the background and table cloth creating harmony.

Lonely Street in Cellara (Pastel on Wallis paper)

A burnt umber pastel with turpenoid was used to tint the Wallis paper before any other part of the painting was added. I did this to enhance the old world look to this very old Italian City street.

Posted in How She Does It | Tagged , , , , , | Leave a comment

YUPO paper?

YUPO paper’s primary material is polypropylene, giving it the outstanding durability and strength of plastic film, combined with the special properties of natural paper. Super smooth, pH Neutral, and an ultra bright white surface make YUPO Watercolor Paper a wonderful substrate to consider as another option in watercolor painting.  There are no trees required in the processing of  YUPO and it  is 100 percent recyclable.

Now, you may go “huh?” What it comes down to is that it is a super slick, plastic, waterproof  paper. Well, why in heaven’s name would someone painting in WATERcolor want to use a waterPROOF paper????


Carolina Wren (Watercolor on YUPO)

Because of it’s very nature, it will change the way watercolors behave. Once you understand how water affects pigment on the paper, it opens up a whole new door to traditional watercolor painting. It allows for a  more loose, more abstract technique. It can retain its bright white color when pigment is easily lifted and removed completely. Realistic representations of the subject can still be expressed on YUPO, so it begs. . . ‘What CAN’T you do on YUPO paper”?

My very first experience with this plastic was a painting I did with no thought other than, “What color combination do I want to lay down on a wet surface?” After that decision I then placed a sheet of Saran wrap on top of my chosen colors and left it level over night to dry. The next morning I removed the Saran wrap layer and what was left was amazing geometric shapes and wonderful color patterns. I studied the shapes, turning the paper around and around. Once I saw something striking, I began to manipulate some of the surrounding shapes, adding different amounts of water to the watercolor pigment in small sections. This is how I got to know how water moves the pigment on the paper. Keeping it abstract stopped me from trying to conjure a too detailed picture that would end up frustrating me  since the point of this painting was just getting to know how the paper works. Once the pigment dried on the paper, if a damp brush is used again in that area, it would lift the color virtually completely. Hmmmm how to adapt this……so I learned……..and I do have fun!!!!


At The Beach (Watercolor on YUPO)

Water is the easiest effect to achieve on YUPO paper. Conducting pigment and water together can create ripples, waves or smooth water scenes. With a damp brush after the background dries I lift out the silhouettes of the people. Lifting again with fine brush gives great highlights!

Make a Wish (Watercolor on YUPO)

Applying color then lifting out details and highlights. It took a few attempts to get the effect that I wanted. It’s easier to rework while the painting is still damp. More details can be added as the painting dries.

Near The End of The Road (Watercolor on YUPO)

Different textures can be achieved by conducting your brush on wet YUPO.  I constantly moved my brush rhythmically as the paint dried to get the look of the cobblestone.

Three Chickadees (Watercolor on YUPO)

Laying in a loose and scattered background gave the effect of winter or early spring branches and stems. Using a damp brush after the background dried I lifted out the silhouettes of the three chickadees. Using less water in certain areas I was able to add details to the birds.

Jim's Crows (Watercolor on YUPO)

My main technique is to do the background first. Loose and free adding only enough detail to “make sense.” After that dries I use a damp brush to clean out the silhouette of the birds, then reapply pigment to give details to the crows.

Spring Thaw (Watercolor on YUPO)

Snow and a white picket fence. That was all about adding the shadows to the white. Melting snow/water is all about the reflections from the fence and shadow casts.

First Impressions, Red Beard (Watercolor on YUPO)

What I love the most is that, if I want, I can step outside my box. I did all manner of pouring color, spraying from the top and letting the colors mix themselves. Accurate portrayal, yes…photo realistic… no way!!! He was an intriguing character with the most beautiful color hair and most unusual beard….photo realism just wouldn’t have suited this character at all.

Posted in How She Does It, Watercolor | Tagged , , , , , , | 2 Comments

How it starts (About Me)

Looking West (Pastel on Ampersand pastel board)

I have an open western view, and does mother nature accommodate me with many a powerful scene!!! Here an approaching storm’s cloud deck is visible moving in. It was already evening, so the drama of the pending change is stunning.

Writers put together a series of well thought out words and what flows from those words are emotional themes, personal perspectives, wondrous events or fictitious journeys. I paint.

I strive to put well thought out color combinations together to capture emotions felt, details observed or record moments now gone.

Watercolor is a joy to work with, especially if it is on Yupo Paper (a slick plastic paper). It gives a whole new dimension and looseness to my work.

But, soft pastel is my true love! I can take the purest form of pigment in a stick and layer them one on top of the other to create colorful silhouettes. Using my hand I can sculpt a portrait or skyline. With blending tools I can add more dimensions to the picture I am painting. Forever forgiving I can follow a painting and make changes easily when opportunities once invisible come to life during the painting’s progression.

I always loved to draw. That love took a huge leap on a family vacation when I was around 12. Our western trek led us to Las Vegas. Not being able to go past the lobby of the casinos, I was all to happy to stand behind the many street artists and just watch them work. Here is where I first saw soft pastels in action! How wonderful to watch how these people could layer a peach on top of a yellow then progress to a rosey hue to burnt sienna, layer and blend, sculpt and refine and then voila!!! A beautiful face emerged! I was in heaven!!!

And so, here is where I share what I’ve learned as I continue my own artistic journey in pastel and watercolor.

Italian Folk Dance (Pastel on Canson)

I had just got some new Terry Ludwig pastels as a gift. Happy as a clam I immediately set off to do some one hour 9×12 portrait and figure paintings. Choosing Canson was to make help minimize detail and to keep it loose.

My Christina

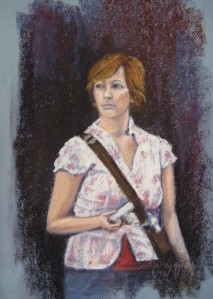
The Tourist (Pastel on Canson paper)

Part of my quick figure paintings, generally tried to stay minimal detail and with in an hour time frame.

Close-up of The Tourist

Detail of the face of ‘The Tourist”. Note the blue hue of the paper coming through to help with the coolness of the painting.

Cannon River (Watercolor on Yupo Paper)

Yupo paper makes water scenes pretty simple, it’s the rest that presents a challenge. Here I painted a realistic scene in an abstract way. Yupo being a plastic lets the water sit on top without absorbing. I wet the area I want to work, drop large globs of color into that area then manipulate the board the paper is on, virtually holding it topside down and drip to the table. As it dried it created very abstract foliage that the eye makes into bushes, trees leaves, etc!

Posted in Pastel, Watercolor | Tagged , , , | Leave a comment